Many people loves their Apple Watch, so do I. As Android Wear improves over the past year, we started to take it seriously. I have got an Huawei Watch with cool round 400x400 pixel AMOLED display. It looks like a traditional watch with a glance at it. The cool thing about having an Android Wear is that you have access to tons of cool watch faces. Apple Watch is limited by the fact that it has limited selection build by Apple, no developer has been given access to build any watch face for it.
You must be wondering how do you connect your Android Wear to iPhone and get access to third party watch faces. The Android Wear iOS app provided by Google provides access to some limited selection of watch faces, you can't use any of those that are out there on the internet developed for Watch Maker or Facer.
Thanks to Kevin from XDA Forum, you are in luck now.
You can now install third party watch faces on your Android Wear and get connected to iPhone for notifications and Google Now. It may not be straight forward but it's easy enough. Since the original instructions is too long winded and kinda incomplete, I have decided to put it up here in a simpler steps for everyone that are interested to follow.


Before you can proceed, the process only works if your watch charger has those 4 pins type of connection. So far I only know of Huawei Watch and LG Urbane. Also you will need to have an Android phone or an emulator.
To keep the story short, here are the steps:
Preparation Works
A. Connect Android Watch to your iPhone
1. Download Android Wear from the App Store.
2. Once installed, run the app and follow the instructions to connect to your watch.
B. Install Android SDK on your Mac
1. Go and download Android Developer Studio from here.
2. Install on your mac.
3. On first install, it will prompt you to install the Android SDK.
4. Proceed to download and install.
C. Enable ADB Debugging option on your Watch
1. Go to Setting | About then tap on the Build Number 7 times until you see that the "Developer Mode" is enabled. Go back to Setting and you should see a Developer Options. Go in there and Enable ADB debugging. Tap OK when prompted for Allow Debugging.
2. Once done, connect your charging cable to the mac USB port and your watch.
Getting Watch Maker and the Watch Faces
This step can either be performed on an Android phone or an Android Emulator. In my steps below, I will be using an Android phone but the steps are identical.
1. Download Watch Maker Premium on your Android phone from the Play Store. You will have to pay for this.
2. Go to http://facerepo.com and download the watch faces that you need and install it on your Watch Maker. My recommendation is to download everything that you need to save future troubles.
3. Download AirDroid on your Android phone. Open it and enable it. Then go to your mac and type in http://web.airdroid.com to connect to your phone. You will need to register and sign in on both of your device. It's free for the first 30 days.
4. Go to the Apps folder once your login to AirDroid. Look for WatchMaker Premium and download it to your mac.

5. Go to the files folder.
6. Look for SDCard and then BeautifulWatches folder. Download the entire folder as a BeautifulWatches.ZIP.

7. Rename the WatchMaker Premium_3.9.9.apk to WatchMaker Premium_3.9.9.zip.
8. Extract the file to a folder.
9. Go to /res/raw folder and copy the android_wear_micro_apk.apk to your mac.
10. Extract your BeautifulWatches.zip file to a folder.
11. Maintain the root BeautifulWatches folder name. I put the entire folder in my download folder.
12. Delete the following folders:
12A. Rename preview_small to preview_mini
13. To delete the hidden folder, open the Terminal app on your mac.
14. Type "cd /users/your username/Downloads/BeautifulWatches/.temp "
15. Type "rm -rf *"
16. Type "rm -rf .*"
17. Type "cd .."
18. Type "rmdir .temp"
19. Type "rm -rf .DS_Store"
Final Step
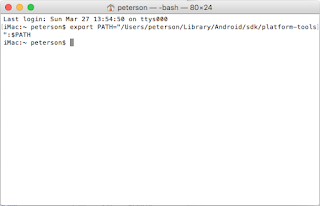
1. Go to Terminal.
2. Type export PATH="/Users/ your username/Library/Android/sdk/platform-tools"
Repeat this command overtime you re-open your terminal to ensure that your path to ADB command is available. Or use this command when you get an "adb command not found" error message.
3. Type "adb -d devices" and you should see your watch listed.

If you see that it is unauthorised, try enable and disable the ADB Debugging on your phone, then select OK when prompted for "Allow Debugging"

4. Go to your /Users/your username/Downloads folder
5. Now you have to install Watch Maker on your Android Wear now. Type "ADB -d install -i slide.watchFrenzy.premium android_wear_micro_apk.apk"
6. You should see a success message.
7. Wait for 5 to 10 seconds and then tap on your watch to set the Watch Maker as your watch face.

8. Type "adb -d push BeautifulWatches ./sdcard/"
10. It will take a few seconds to copy the folder from your mac to the watch.
11. Once you see the successful message, you can type "adb -d reboot"
12. When the watch is rebooted, you can tap on the watch maker face to change to the desired watch faces that you have downloaded earlier!

Happy Changing Watch Faces! If you have benefits from my simpler instructions and would like to contribute to my writing hobby, please donate any amount via Paypal to ptan218@gmail.com. Thank you.
You must be wondering how do you connect your Android Wear to iPhone and get access to third party watch faces. The Android Wear iOS app provided by Google provides access to some limited selection of watch faces, you can't use any of those that are out there on the internet developed for Watch Maker or Facer.
Thanks to Kevin from XDA Forum, you are in luck now.
You can now install third party watch faces on your Android Wear and get connected to iPhone for notifications and Google Now. It may not be straight forward but it's easy enough. Since the original instructions is too long winded and kinda incomplete, I have decided to put it up here in a simpler steps for everyone that are interested to follow.


Before you can proceed, the process only works if your watch charger has those 4 pins type of connection. So far I only know of Huawei Watch and LG Urbane. Also you will need to have an Android phone or an emulator.
To keep the story short, here are the steps:
Preparation Works
A. Connect Android Watch to your iPhone
1. Download Android Wear from the App Store.
2. Once installed, run the app and follow the instructions to connect to your watch.
B. Install Android SDK on your Mac
1. Go and download Android Developer Studio from here.
2. Install on your mac.
3. On first install, it will prompt you to install the Android SDK.
4. Proceed to download and install.
C. Enable ADB Debugging option on your Watch
1. Go to Setting | About then tap on the Build Number 7 times until you see that the "Developer Mode" is enabled. Go back to Setting and you should see a Developer Options. Go in there and Enable ADB debugging. Tap OK when prompted for Allow Debugging.
2. Once done, connect your charging cable to the mac USB port and your watch.
Getting Watch Maker and the Watch Faces
This step can either be performed on an Android phone or an Android Emulator. In my steps below, I will be using an Android phone but the steps are identical.
1. Download Watch Maker Premium on your Android phone from the Play Store. You will have to pay for this.
2. Go to http://facerepo.com and download the watch faces that you need and install it on your Watch Maker. My recommendation is to download everything that you need to save future troubles.
3. Download AirDroid on your Android phone. Open it and enable it. Then go to your mac and type in http://web.airdroid.com to connect to your phone. You will need to register and sign in on both of your device. It's free for the first 30 days.
4. Go to the Apps folder once your login to AirDroid. Look for WatchMaker Premium and download it to your mac.

5. Go to the files folder.
6. Look for SDCard and then BeautifulWatches folder. Download the entire folder as a BeautifulWatches.ZIP.

7. Rename the WatchMaker Premium_3.9.9.apk to WatchMaker Premium_3.9.9.zip.
8. Extract the file to a folder.
9. Go to /res/raw folder and copy the android_wear_micro_apk.apk to your mac.
10. Extract your BeautifulWatches.zip file to a folder.
11. Maintain the root BeautifulWatches folder name. I put the entire folder in my download folder.
12. Delete the following folders:
- a. .temp (this is hidden, see below for instructions to remove it)
- b. export
- c. featured
- d. preview
- e. preview_dim
- f. preview_mini
- g. share
- h. wallpaper_bg
12A. Rename preview_small to preview_mini
13. To delete the hidden folder, open the Terminal app on your mac.
14. Type "cd /users/your username/
15. Type "rm -rf *"
16. Type "rm -rf .*"
17. Type "cd .."
18. Type "rmdir .temp"
19. Type "rm -rf .DS_Store"
Final Step
1. Go to Terminal.
2. Type export PATH="/Users
Repeat this command overtime you re-open your terminal to ensure that your path to ADB command is available. Or use this command when you get an "adb command not found" error message.

3. Type "adb -d devices" and you should see your watch listed.

If you see that it is unauthorised, try enable and disable the ADB Debugging on your phone, then select OK when prompted for "Allow Debugging"

4. Go to your /Users/your username/Downloads folder
5. Now you have to install Watch Maker on your Android Wear now. Type "ADB -d install -i slide.watchFrenzy.premium android_wear_micro_apk.apk"
6. You should see a success message.
7. Wait for 5 to 10 seconds and then tap on your watch to set the Watch Maker as your watch face.

8. Type "adb -d push BeautifulWatches ./sdcard/"
10. It will take a few seconds to copy the folder from your mac to the watch.
11. Once you see the successful message, you can type "adb -d reboot"
12. When the watch is rebooted, you can tap on the watch maker face to change to the desired watch faces that you have downloaded earlier!

Comments
I've rest my watch and did the last 2 steps again. Now it works great
As for Windows machines? Yes, you can get it to work by using the Terminal application.
Thanks a lot